Introduction
In an age where the streaming revolution continues to reshape our digital landscape, it's not just about binge-watching our favorite TV shows anymore. For instance, as of late, the concept of streaming has been applied to gaming: you no longer need to have a high-end PC or even install a game to play it. Instead, you can use a service like Nvidia GeForce Now to launch a game on a remote server and interact with it through the web. The remote machine performs all of the necessary processing to render the frames of the game that you're playing and sends the result to you. Meanwhile, all your computer does is draw the frames received from the server on the screen and send your input events back to the server so that you can interact with the game.
Sounds pretty cool. So, what if we could apply the same approach to usual macOS apps? Could we launch an app remotely and display it on our screen like it's actually running on our Mac? We decided to test just that.
Below is the story of our first attempt at implementing an application streaming prototype. Spoilers: there's still much to do and even some stuff to redo, but we have decided to document our current achievements in this field anyway. Let's dive in!
Technical Task
First, let's define what we'll try to implement in technical detail. We'll be using two MacBooks; one will serve as the streaming Server, and the other will be the Client. The workflow between them should be the following:
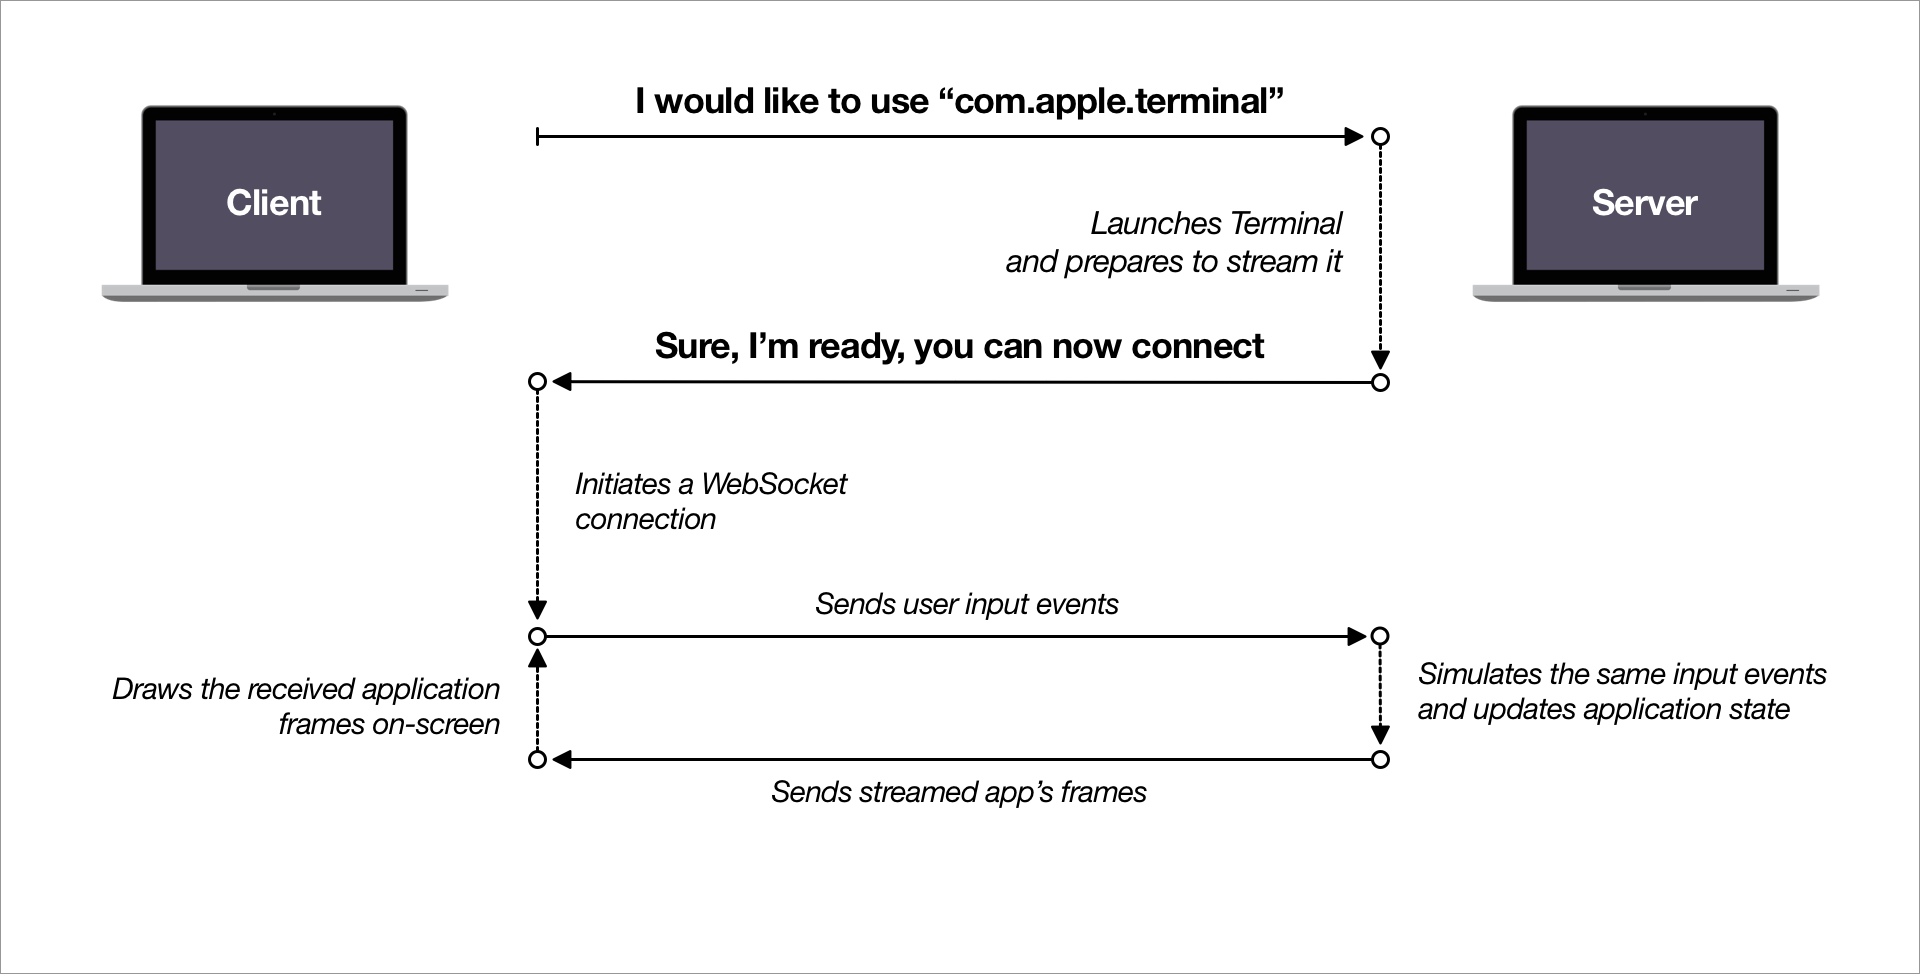
- The Client decides which application to use and sends a specific web request containing the desired app's bundle ID to the Server.
- The Server launches the specified application if it is present on the machine, sets up any functionality needed for its streaming, and responds to the Client on whether the preparations were successful.
- The Client establishes a WebSocket connection with the Server, and a two-way communication commences:
- The Server sends the streamed application's UI to the Client, frame by frame. The Client draws these frames on the user's display.
- The Client sends the user's input events to the Server, which it repeats to simulate interaction with the streamed application.
Important notes:
- The streamed application must appear on the Client's side without any other UI from the remote display. We don't want to recreate the experience of a TeamViewer session where you see the entire remote desktop — we'll be streaming only the desired app. The idea is to make the UX as close to running a native app as possible.
- The streamed application is a 3-rd party app we cannot modify or control. In other words, there's no way to establish an XPC connection for data exchange.
The idea looks straightforward on paper, but we've never tried implementing anything similar before. We'll tackle this problem by dividing it into separate development steps.
Development Steps
Basic application development
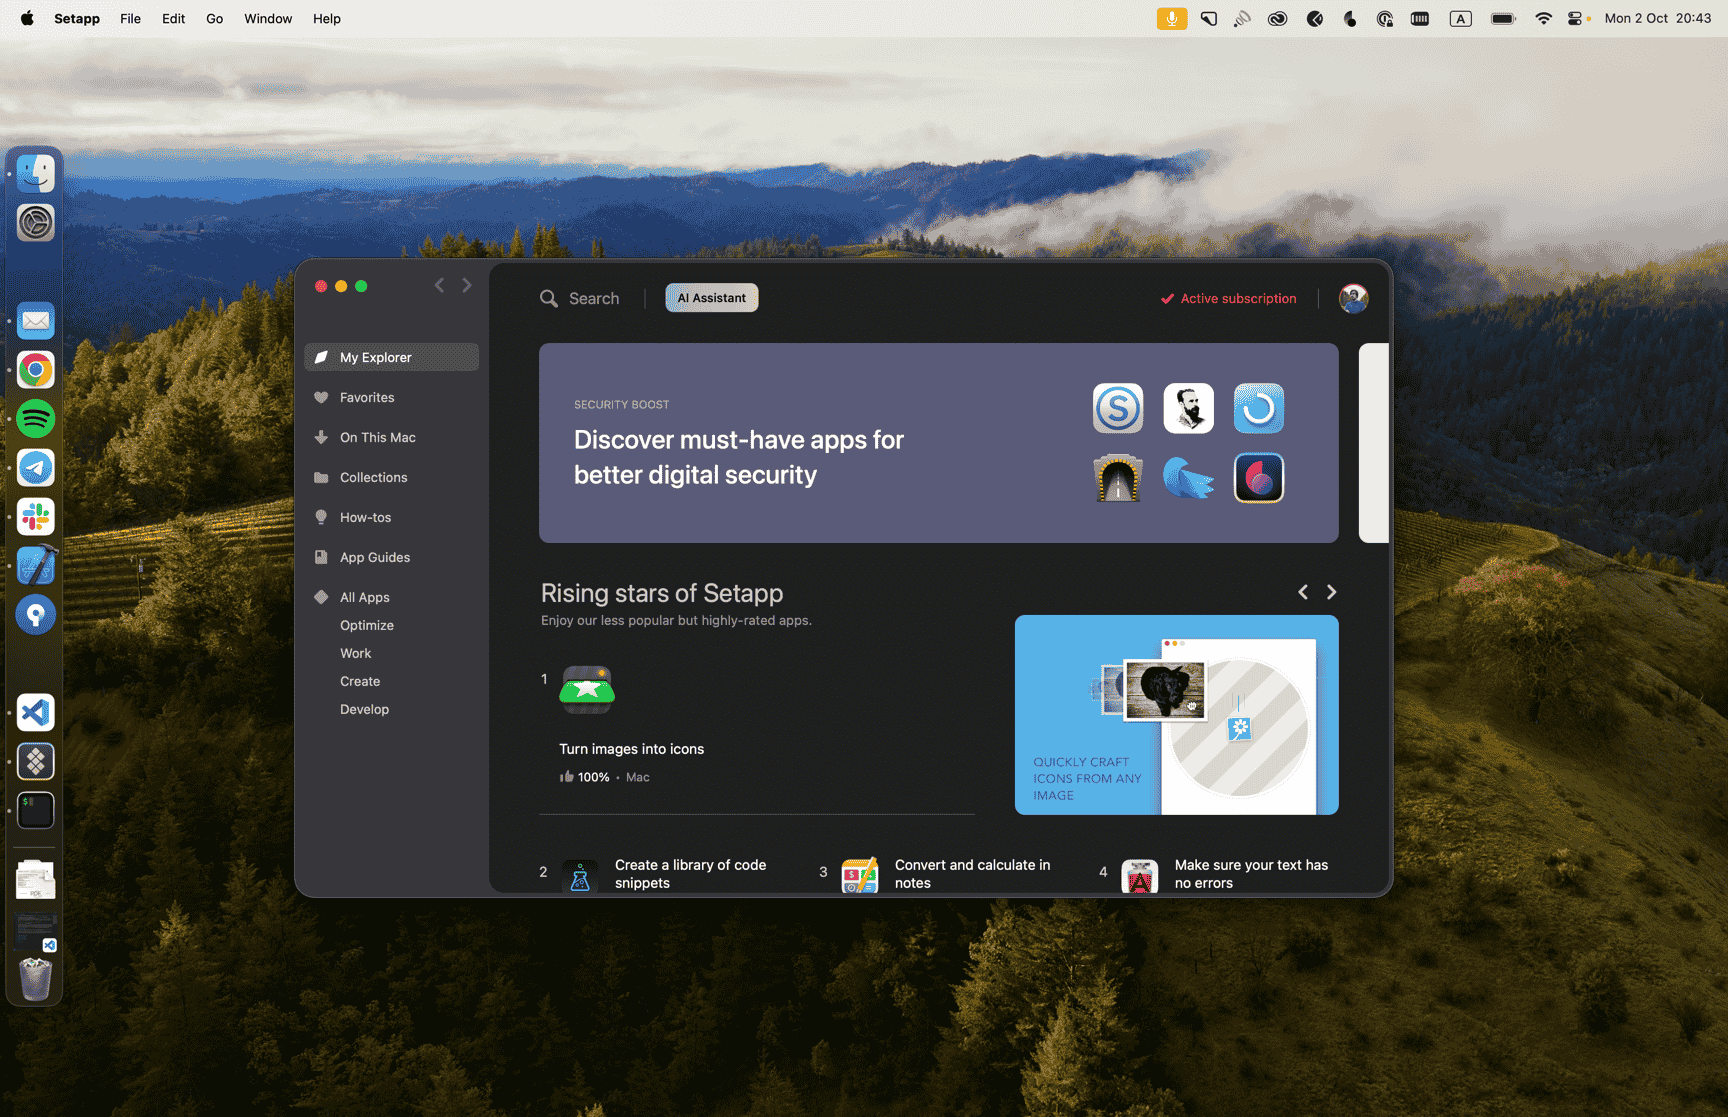
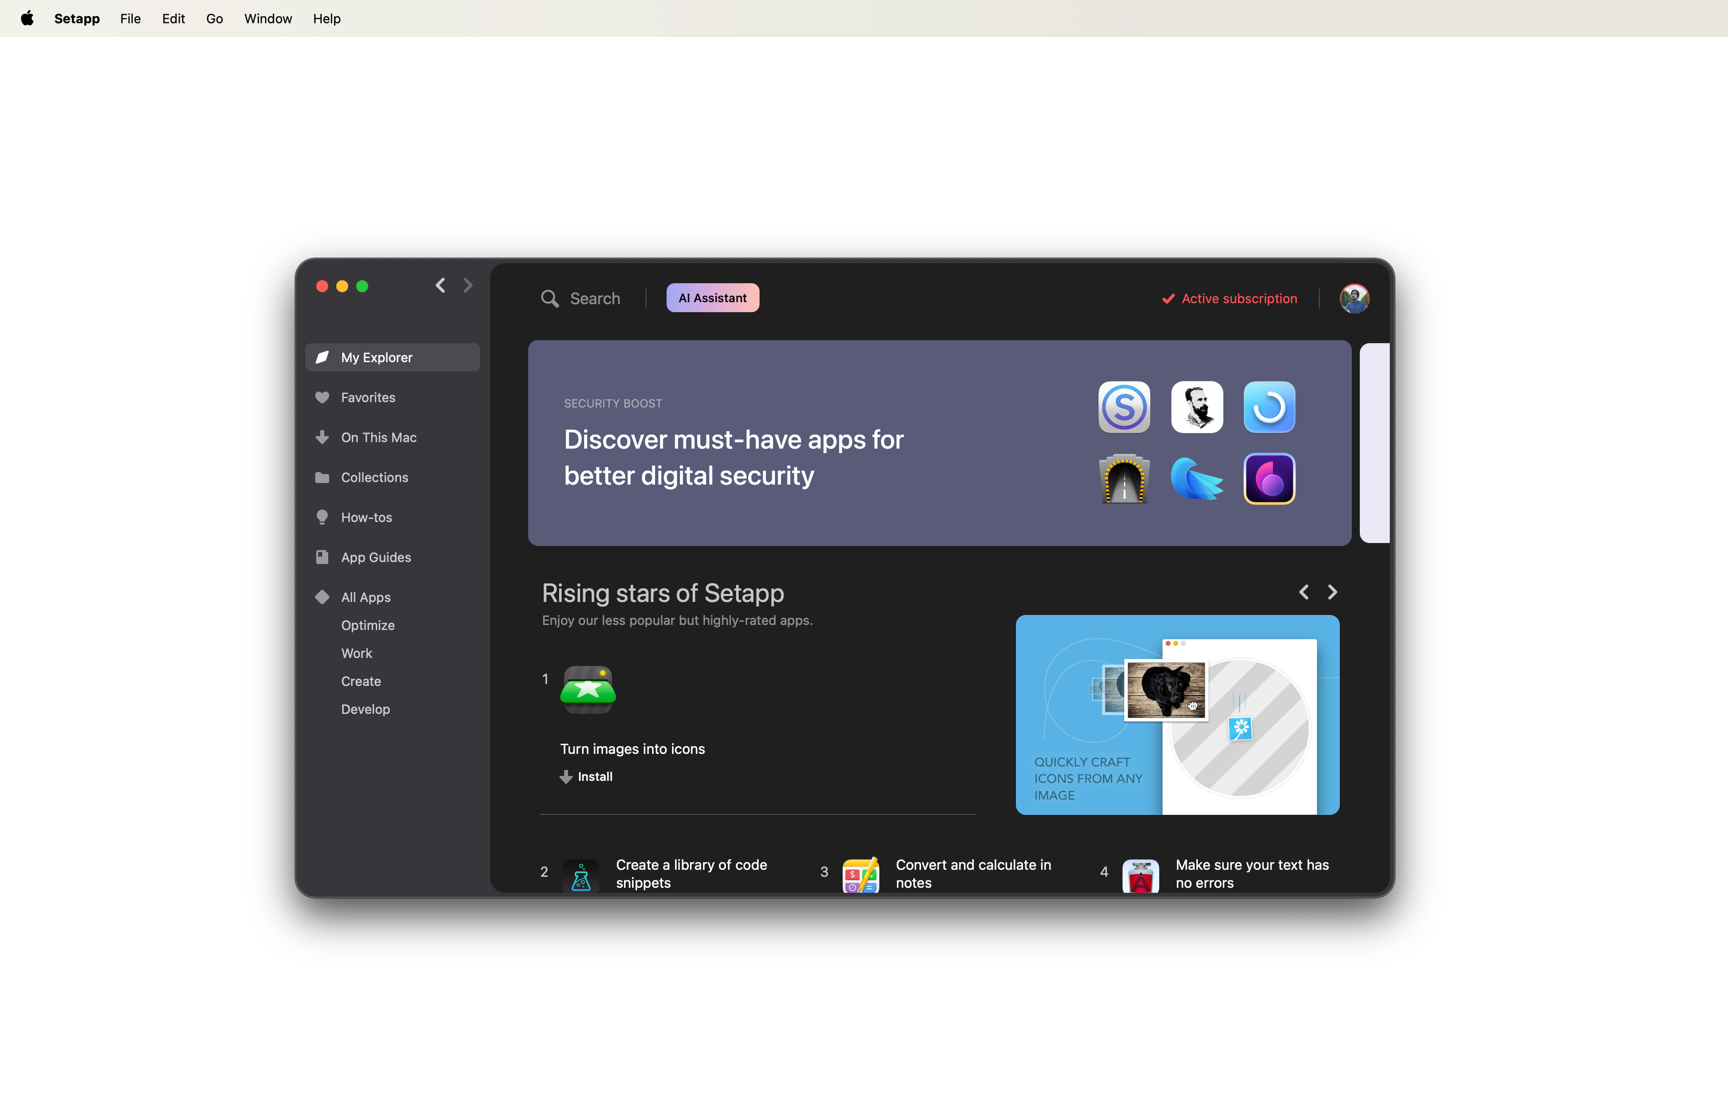
We'll start off by creating two macOS applications, we'll call them AppStreamingClient and AppStreamingServer. Their names speak for themselves — each one is to be launched on its designated MacBook and perform the role of a server or client. We'll do some basic UI setup as well, and the apps will end up looking like this:
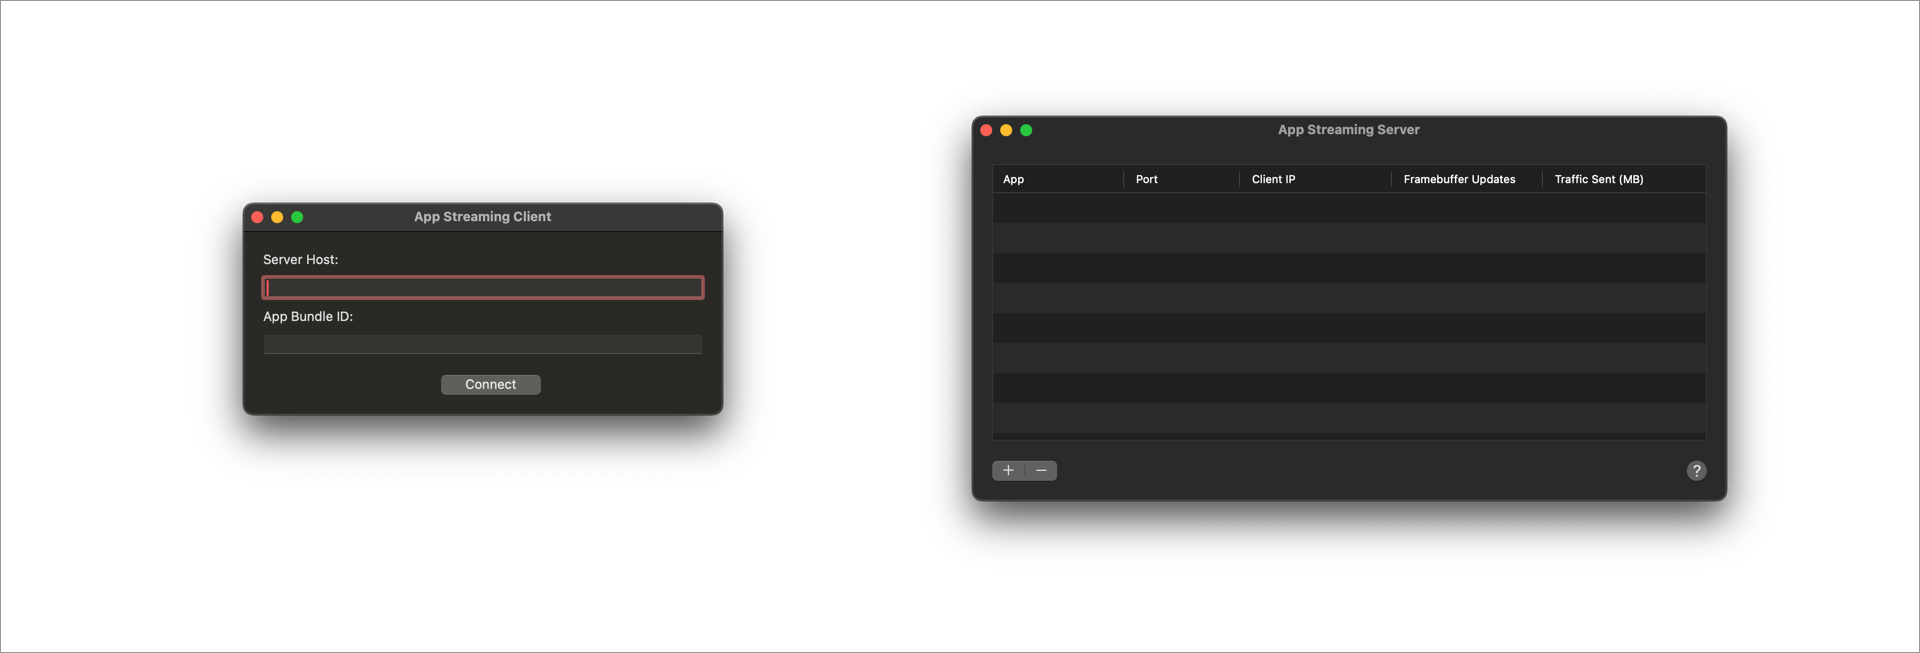
The Client app requires the user to specify the IP address of the Server computer and the bundle identifier of an application they would like to use remotely. The Server's UI is primarily informational and doesn't require any interaction for it to work — it'll simply output info on established connections to Clients (plural, there may be more than one), e.g., how much traffic has been sent to each Client.
We can go ahead and implement the first two steps of our tech task right away, the ones where the Client asks the Server to launch an app and gets a response. We'll be sending a GET request of the following type:
let url = URL(string: "http://\(host):\(port)/init/\(bundleID)")
Sending the request is easy; use a URLSession.dataTask(request: ...), and you're good to go. Listening to incoming requests is a bit less trivial, though. To save time on the implementation, we'll use a tiny Swift Package called Swifter. It will allow us to quickly implement an HTTP server and listen to specific requests with only a few lines of setup, like so:
private lazy var server: HttpServer = {
    let server = HttpServer()

    server.get["/init/:bundleID"] = { [weak self] request in

        // Get the bundleID from the request's path
        let bundleID = request.params.first?.value

        // Launch the specified application.
        // `applicationLauncher` is a wrapper over the asynchronous `NSWorkspace.openApplication(...)` call,
        // which performs the job synchronously instead.
        applicationLauncher.launchApplication(with: bundleID)

        // Return the response after the application is launched.
        // The response should contain a port number to use to establish a WebSocket connection
        // for the upcoming streaming data transmissions. In this example, for the sake of brevity,
        // we've specified the port 5901 statically, though in true implementation we should look for
        // a currently unused port and provide it instead.
        return .ok(.json(["data": ["port": 5901]]))
    }

    return server
}()

do {
    // Start the server on port 5900.
    try server.start(5900)
} catch {
    preconditionFailure("HTTP server init failed: \(error.localizedDescription)")
}
Once the Client receives the response, it should establish a WebSocket connection to the same computer using the provided port number.
Establishing the streaming communication
Now, we must figure out how to make two computers continuously communicate with each other and transmit specific types of data. They should be able to exchange at least two messages: one containing a frame of the streamed application and another providing a user's input event. It is definitely possible to implement this from scratch, but it would take a lot of time and effort to do so in high quality.
The communication protocol we're after looks quite familiar, and you've probably dealt with it yourselves if you have ever used any remote desktop software before (e.g., TeamViewer mentioned above). In fact, this technology is about two decades old, and its name is RFB protocol or VNC systems.
RFB ("remote framebuffer") is a simple protocol for remote access to graphical user interfaces. Because it works at the framebuffer level, it is applicable to all windowing systems and applications, including X11, Windows, and Macintosh. RFB is the protocol used in VNC (Virtual Network Computing).
The remote endpoint where the user sits (i.e., the display plus keyboard and/or pointer) is called the RFB client or viewer. The endpoint where changes to the framebuffer originate (i.e,. the windowing system and applications) is known as the RFB server.
So, in other words, RFB is a standardized and time-tested way of controlling a remote desktop through the web, which fits our needs just right. Just instead of interacting with the entire remote desktop, we'll settle on a single on-screen app, but we'll get to that shortly. VNC is another term frequently used to describe basically the same thing: a VNC system is a combination of multiple computers that conform to the RFB protocol and can communicate with each other.
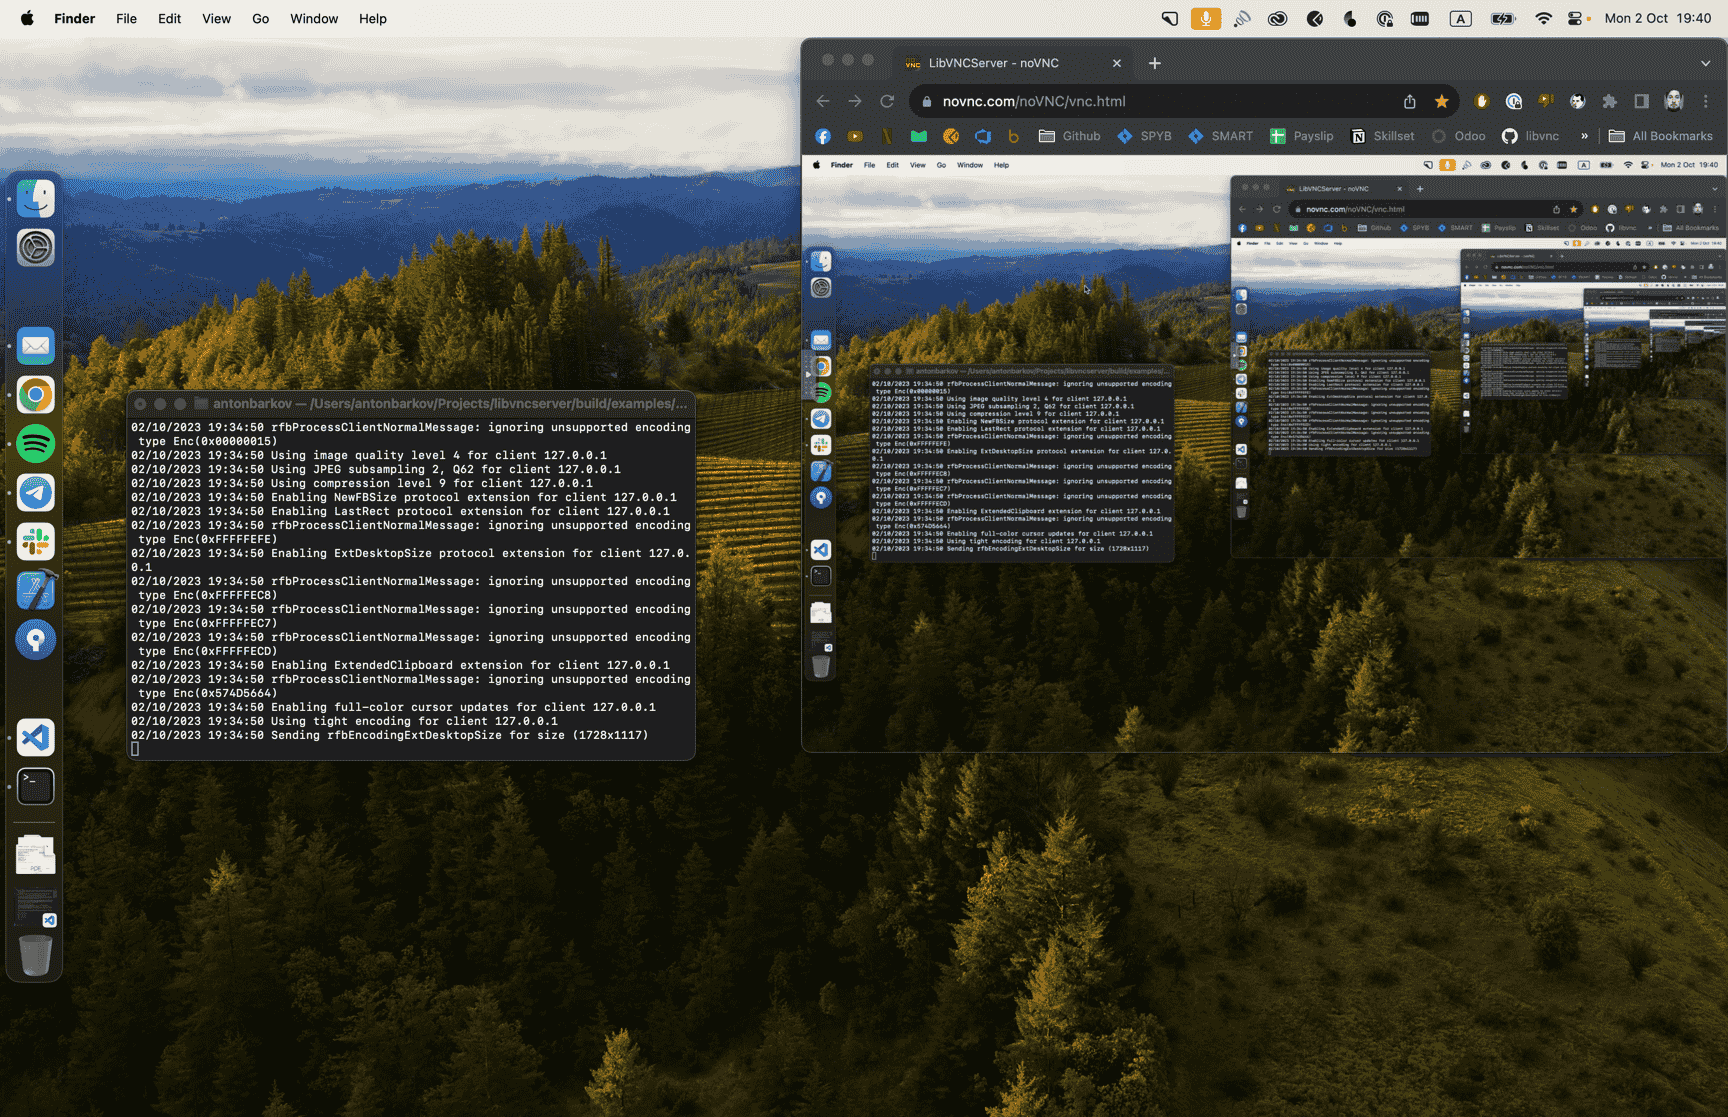
Despite having the blueprints for implementing an RFB-conforming piece of software, it would still prove quite a challenging task — just take a glance at the protocol specification to get the basic idea of how much there is to account for. Luckily for us, the developer community behind VNC is quite large and active, and it didn't take long to find an open-source solution for our needs. Meet libvnc — a cross-platform set of libraries written in C that trivialize implementing a VNC server or client.
We can test their capabilities without any prior coding:
- Clone the repository and build the sources (make sure you have CMake installed).
- The newly-created build folder contains the distributable
libvncserverandlibvncclientlibraries, which we'll use in our apps. But for now, find theexamples/server/macbinary in the same folder and launch it — a Terminal window will appear, and if there are no errors, you've successfully launched a VNC server on your Mac. - Go to novnc.com — this is a distribution of an open-source VNC web client, which allows you to connect to any VNC server out there, no matter the platform it's running on (pretty awesome, right?). Go ahead and connect it to
127.0.0.1:5900.
If everything is done right, you should see your desktop appear in your browser window like so:
The libraries will cover the most challenging part of the job: they'll perform all of the necessary handshakes to setup a WebSocket connection between our two Macs, and handle all of the complexities of data transmission between them. As the libraries' clients, we only have to provide them with framebuffers/events to send to the other side.
For details on libs usage, please refer to libvnc documentation.
Server-side screen capture
With the communication capabilities successfully set up, we can move on to implementing specific on-device logic. We'll start with capturing our streamed application's UI, which is pretty straightforward, thanks to Apple.
At WWDC 2022, Apple announced its new framework — ScreenCaptureKit. It allows for effortless screen capture (duh 🙂) and provides many ways to customize what exactly you want to include in or leave out of the final result. Obviously, due to the framework being relatively new, it raises our minimum macOS requirement all the way to macOS 13 (Ventura). We consider this acceptable, as the Server machine will surely be set up on the side of the streaming service provider; it can be configured in whichever way is needed. We won't have similar restrictions on the Client's side.
The streaming process is handled through a SCStream object, which relies on two other configuration objects: SCContentFilter and SCStreamConfiguration. Out of the box, with the most basic setup, you can grab the entirety of your display like so:
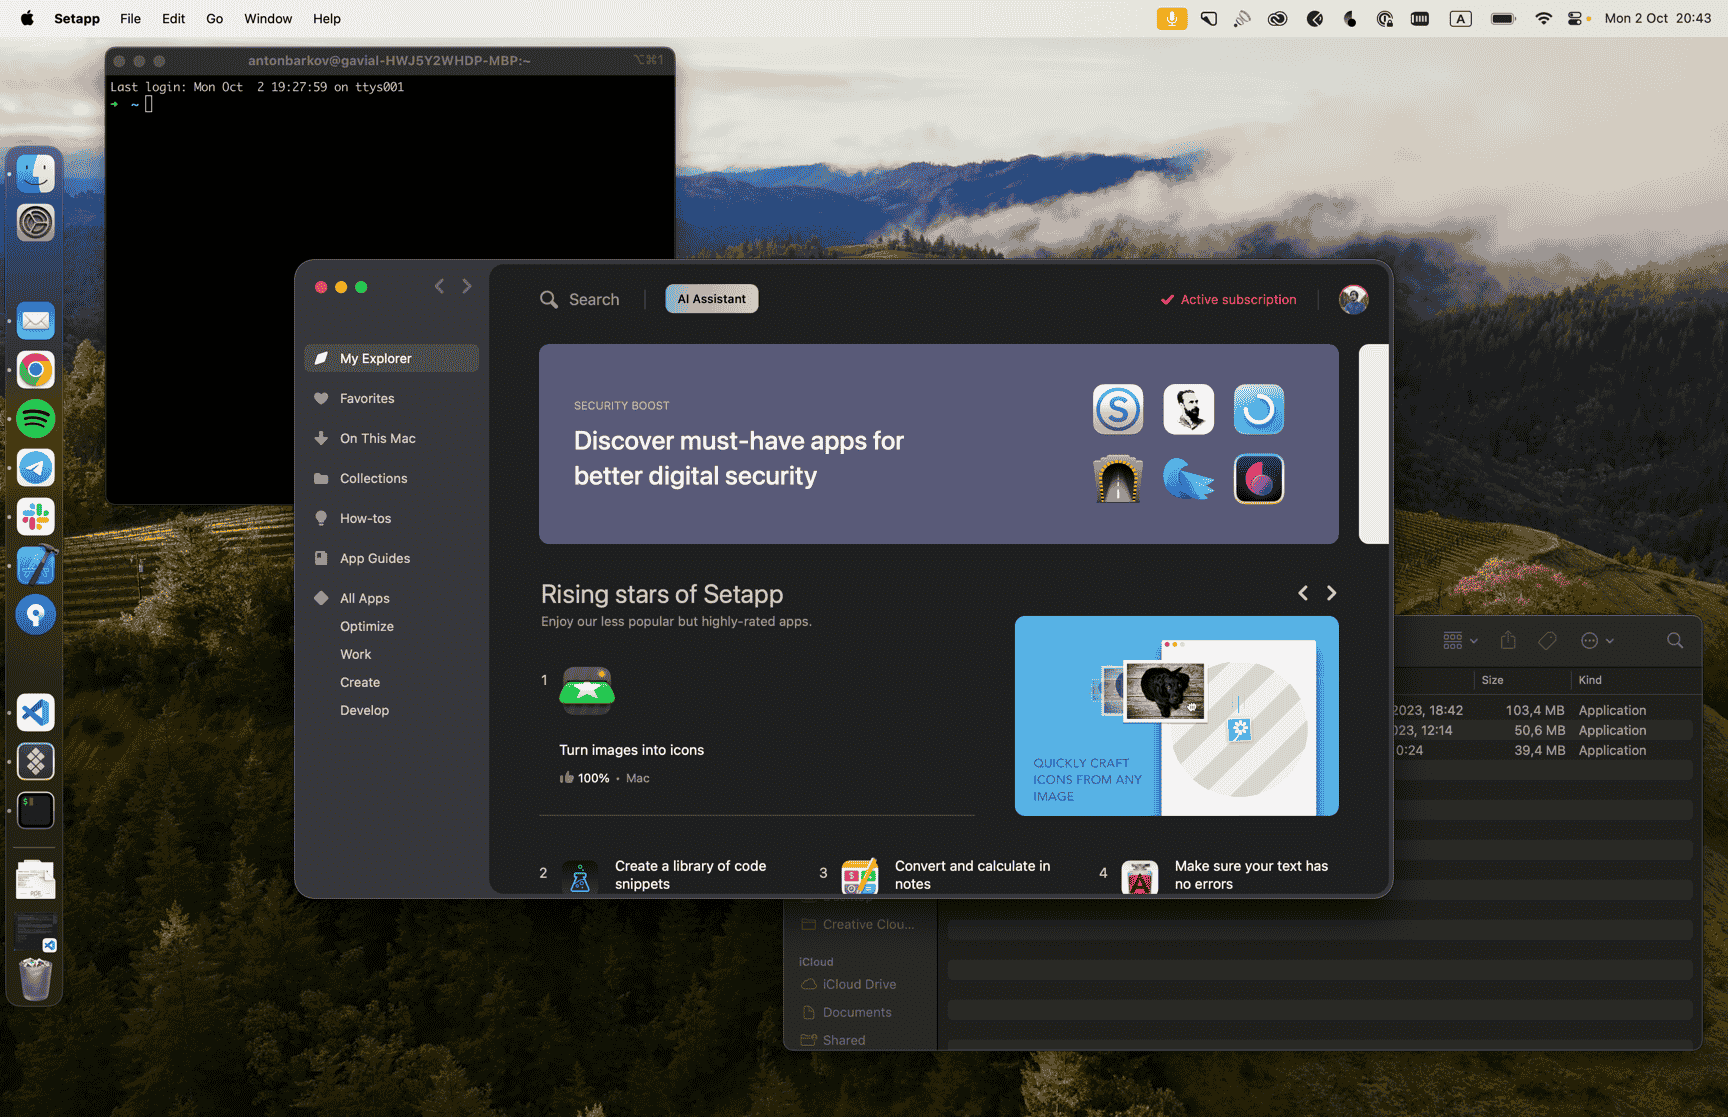
Let's say we want to stream Setapp to our Client, the window in the center of the screenshot. The current picture won't work for us — we don't want the Client to see our whole screen with other unrelated windows open, we want to stream just the specific app. Luckily, SCContentFilter lets us define which apps we want to include in our stream. If we specify Setapp there, the output will change in the following way:
The picture looks better, but we still have the desktop background image that our Client doesn't need to see, and this is where SCStreamConfiguration comes to the rescue. If we set its backgroundColor property to .clear, the background fades away completely, and all that's left is Setapp UI and the menubar:
The picture now fits our needs precisely, and this is the exact kind of framebuffer we'll be sending to the Client.
Server-side framebuffer handling
Handling framebuffers received from SCStream and sending them to the Client has a few pitfalls. We learned about them the hard way and decided they're worth a special mention.
What exactly is a framebuffer? Simply put, it's a region of memory (RAM, to be precise) that stores pixel data for continuous on-screen rendering. How much memory does a framebuffer occupy? In bytes, exactly as much as the number of pixels in a given image multiplied by the number of color components in a pixel. For example, a 100x100 pixel image in RGBA format will occupy 100 * 100 * 4 = 40000 bytes, or roughly 39 kilobytes. Pretty simple so far.
Notice how we wrote "continuous on-screen rendering" back there? That word is elaborate. Let's say you're watching a video, dozens of frames changing on-screen every second. And yet, only one framebuffer is used to draw them all, as the image data is constantly being overwritten and read from the same memory region. This purposeful optimization skips the process of allocating/deallocating graphics in the memory — things just work faster if we allocate the needed memory size once and keep using that same region for frequent visual updates.
Cool, you might say, so what's the issue here? A possible data race condition is the issue. If we don't synchronize our read-write operations properly, we might end up with screen tearing and similar visual artifacts on the Client's side. Simply put, it's like reading a book page that is being constantly rewritten before your eyes — things just won't make sense. Roughly the same will happen to our Client: the framebuffer gets rewritten at the exact moment it is being sent to the Client, which results in broken pixel data or image misalignment.
There's a known solution to this problem, a technique called framebuffer swapping. We allocate two framebuffers and make one readable to the Client, while the other is writeable for our SCStream output. As soon as we get an update from the stream, we swap those framebuffers, and the process repeats. Here's the simplified code:
typealias FrameBuffer = UnsafeMutablePointer<Int8>

final class VNCServer: NSObject {

    // Framebuffers.
    // One of them is readable to the client while the other is being updated with new pixel data,
    // then they get swapped and the process repeats.
    // This protects from screen tearing & similar artefacts on the client's side.
    private var frameBufferOne: FrameBuffer?
    private var frameBufferTwo: FrameBuffer?
    private var backBuffer: FrameBuffer? // points to the currently writeable buffer

    // Pointers to objects provided by libvncserver.
    // One represents our server and the other — a possibly connected client.
    private var libServer: rfbScreenInfoPtr?
    private var libClient: rfbClientPtr?

    override init() {
        super.init()

        mallocFrameBuffers(displaySize: NSScreen.main!.frame.size)
        swapFrameBuffers()

        // Do all of the other necessary server setup here
    }

    func mallocFrameBuffers(displaySize: CGSize) {
        frameBufferOne?.deallocate()
        frameBufferTwo?.deallocate()

        let bytes = Int(displaySize.width) * Int(displaySize.height) * 4
        frameBufferOne = FrameBuffer.allocate(capacity: bytes)
        frameBufferTwo = FrameBuffer.allocate(capacity: bytes)
    }

    func swapFrameBuffers() {
        if backBuffer == frameBufferOne {
            backBuffer = frameBufferTwo
            libServer?.pointee.frameBuffer = frameBufferOne
        } else {
            backBuffer = frameBufferOne
            libServer?.pointee.frameBuffer = frameBufferTwo
        }
    }
}

extension VNCServer: SCStreamOutput {

    // An SCStream delegate method used to handle stream output.
    func stream(_ stream: SCStream, didOutputSampleBuffer sampleBuffer: CMSampleBuffer, of type: SCStreamOutputType) {
        guard let libServer, let screen = NSScreen.main, sampleBuffer.isValid else { return }

        guard let attachmentsArray = CMSampleBufferGetSampleAttachmentsArray(sampleBuffer, createIfNecessary: false) as? [[SCStreamFrameInfo: Any]],
              let attachments = attachmentsArray.first,
              let statusRawValue = attachments[SCStreamFrameInfo.status] as? Int,
              let status = SCFrameStatus(rawValue: statusRawValue),
              status == .complete else { return }

        // Get the pixel buffer that contains the image data.
        guard let pixelBuffer = sampleBuffer.imageBuffer else { return }

        // Get the backing IOSurface.
        guard let surface = CVPixelBufferGetIOSurface(pixelBuffer)?.takeUnretainedValue() else { return }

        // Lock client from reading the buffer
        if let libClient {
            guard pthread_mutex_lock(&libClient.pointee.sendMutex) == 0 else {
                preconditionFailure("pthread_mutex_lock failed")
            }
        }

        // Lock the surface and copy it to our backBuffer
        IOSurfaceLock(surface, .readOnly, nil)
        memcpy(
            backBuffer,
            IOSurfaceGetBaseAddress(surface),
            Int(screen.frame.width) * Int(screen.frame.height) * 4
        )
        IOSurfaceUnlock(surface, .readOnly, nil)

        // Swap the buffers!
        swapFrameBuffers()

        // Reenable client reads
        if let libClient {
            guard pthread_mutex_unlock(&libClient.pointee.sendMutex) == 0 else {
                preconditionFailure("pthread_mutex_unlock failed")
            }
        }
    }
}
Client-side frame drawing
The image data we receive on the Client's side is, of course, also provided in the form of a framebuffer. So, it might be a little tricky to figure out how to transform that raw pixel data into something we can output into the UI.
In a nutshell, the approach we took is the following:
- The AppStreamingClient app presents a transparent borderless window stretched across the user's screen. It's pretty basic stuff; we won't go into detail on this one.
- We implement a custom
VNCFramebufferViewas the window's content view. The view has a backingCALayer, and we'll use itscontentsto display the framebuffer data after we complete the necessary conversions. VNCFramebufferViewhas two public methods:setFrameBuffer(_ frameBuffer: FrameBuffer)— we'll use it once we establish a connection to the Server and provide the view with a pointer to the memory region holding the pixel data. We'll be dealing with a single framebuffer this time; there's no need for swapping like on the Server.handleFrameBufferUpdated(rect: NSRect)— we'll call this whenever we receive a framebuffer update from the Server. Therectparameter represents the image coordinates that must be redrawn.
- The view will redraw its contents with the help of a
CVDisplayLinkto achieve smooth and synchronized picture updates. - To get a usable image representation of the framebuffer data, we must first transform it back into an
IOSurface. The surface can then be easily fed to aCIImageinitializer for further output on-screen.
Here's the VNCFramebufferView implementation:
struct FrameBuffer {
    let pointer: UnsafeMutableRawPointer
    let width: Int
    let height: Int
    let pixelFormat: OSType
    let bytesPerPixel: Int
}

final class VNCFramebufferView: NSView {

    // MARK: Init

    override init(frame frameRect: NSRect) {
        super.init(frame: frameRect)
        wantsLayer = true
        layer?.drawsAsynchronously = true
        layer?.masksToBounds = true
        layer?.allowsEdgeAntialiasing = false
    }

    required init?(coder: NSCoder) {
        fatalError("init(coder:) has not been implemented")
    }

    deinit {
        removeDisplayLink()
    }

    // MARK: Public

    func setFrameBuffer(_ frameBuffer: FrameBuffer) {
        self.frameBuffer = frameBuffer
        self.surface = IOSurface(properties: [
            .width: frameBuffer.width,
            .height: frameBuffer.height,
            .pixelFormat: frameBuffer.pixelFormat,
            .bytesPerElement: frameBuffer.bytesPerPixel,
            .bytesPerRow: frameBuffer.width * frameBuffer.bytesPerPixel,
            .allocSize: frameBuffer.width * frameBuffer.height * frameBuffer.bytesPerPixel
        ])
    }

    func handleFrameBufferUpdated(rect: NSRect) {
        updateSurface(rect: rect)
    }

    // MARK: Private

    private let ciContext = CIContext()
    private var frameBuffer: FrameBuffer?
    private var surface: IOSurface?
    private var displayLink: DisplayLink?
}

// MARK: - Overrides

extension VNCFramebufferView {

    override func viewDidMoveToWindow() {
        super.viewDidMoveToWindow()
        addDisplayLink()
    }
}

// MARK: - Display link

extension VNCFramebufferView: DisplayLinkDelegate {

    private func addDisplayLink() {
        removeDisplayLink()

        guard let window = window,
              let screen = window.screen ?? NSScreen.main else {
            return
        }

        guard let displayLink = DisplayLink(screen: screen) else { return }
        displayLink.delegate = self
        displayLink.isEnabled = true
        self.displayLink = displayLink
    }

    private func removeDisplayLink() {
        guard let oldDisplayLink = self.displayLink else { return }
        oldDisplayLink.delegate = nil
        oldDisplayLink.isEnabled = false
        self.displayLink = nil
    }

    func displayLinkDidUpdate(_ displayLink: DisplayLink) {
        DispatchQueue.main.async { [self] in
            guard let surface else { return }

            surfaceLockReadOnly(surface)
            let ciImage = CIImage(ioSurface: surface)
            surfaceUnlockReadOnly(surface)

            layer?.contents = ciContext.createCGImage(ciImage, from: ciImage.extent, format: .BGRA8, colorSpace: CGColorSpaceCreateDeviceRGB(), deferred: true)
        }
    }
}

// MARK: - Private

private extension VNCFramebufferView {

    func surfaceLockReadOnly(_ surface: IOSurface) {
        IOSurfaceLock(surface, [.readOnly], nil)
    }

    func surfaceUnlockReadOnly(_ surface: IOSurface) {
        IOSurfaceUnlock(surface, [.readOnly], nil)
    }

    func surfaceLockReadWrite(_ surface: IOSurface) {
        IOSurfaceLock(surface, [], nil)
    }

    func surfaceUnlockReadWrite(_ surface: IOSurface) {
        IOSurfaceUnlock(surface, [], nil)
    }

    func updateSurface(rect: NSRect) {
        guard let surface, let frameBuffer else { return }

        surfaceLockReadWrite(surface)
        defer { surfaceUnlockReadWrite(surface) }

        let bytesPerPixel = surface.bytesPerElement
        let bytesPerRow = surface.bytesPerRow

        let x = Int(rect.minX)
        let y = Int(rect.minY)
        let width = Int(rect.width)
        let height = Int(rect.height)

        for row in y..<y+height {
            let offset = row * bytesPerRow + x * bytesPerPixel
            let bytesToCopy = width * bytesPerPixel

            let source = frameBuffer.pointer.advanced(by: offset)
            let target = surface.baseAddress.advanced(by: offset)

            target.copyMemory(from: source, byteCount: bytesToCopy)
        }
    }
}
Let's try this out on our Project 3D app. We'll connect to the Server, specify the app's bundle ID as com.macpaw.Project3D, and launch an animation with a transparent background. Here's the result:
To summarize, at the moment, we've achieved the following:
- The streamed application appears on the Client's side without any unrelated UI, except for the menubar, a welcome addition.
- The stream supports transparency inside the app.
- The animated content inside the app is drawn without graphical artifacts and almost no stuttering. The latter has to do with the shortcomings of the VNC technology, and we'll touch on that in more detail at the end of this article.
All that's left to do is implement the ability to control the streamed application. Let's get to it!
Client-side events forwarding
The way the Client should send its input events is thoroughly documented in the RFB specification. We'll go into detail on how to implement mouse event forwarding. As for the keyboard, the approach would be pretty similar. You may look up a detailed implementation in the examples folder of libvnc.
The gist of it is to monitor for mouse events firing on our VNCFramebufferView via an NSTrackingArea and then transform those events into the format conforming to the RFB protocol. According to the spec, each mouse button should be represented by a number in a 0-7 bit mask. For simplicity, we can define all of the mouse buttons via a struct:
struct VNCMouseEvent: OptionSet {

    let rawValue: Int32

    static let leftButton = VNCMouseEvent(rawValue: 1 << 0)
    static let middleButton = VNCMouseEvent(rawValue: 1 << 1)
    static let rightButton = VNCMouseEvent(rawValue: 1 << 2)
    static let scrollUp = VNCMouseEvent(rawValue: 1 << 3)
    static let scrollDown = VNCMouseEvent(rawValue: 1 << 4)
    static let scrollLeft = VNCMouseEvent(rawValue: 1 << 5)
    static let scrollRight = VNCMouseEvent(rawValue: 1 << 6)
}
Then, if we want to say that an event is happening with the left mouse button, we can get its code like so:
print(VNCMouseEvent.leftButton.rawValue)
// prints "1"
Or, for example, the left and right mouse buttons are being pressed simultaneously:
print(VNCMouseEvent.leftButton.rawValue | VNCMouseEvent.rightButton.rawValue)
// prints "5" (LMB = 1, RMB = 4)
The method in libvncclient that we'll use to send mouse events is SendPointerEvent. Aside from the button identifier, it requires the event coordinates relative to the streamed display. If we put all of this together, the primary use cases are the following:
// Somewhere in VNCFramebufferView we handle the mouse events

override func mouseMoved(with event: NSEvent) {
    SendPointerEvent(event.locationInWindow.x, event.locationInWindow.y, 0)
}

override func mouseDown(with event: NSEvent) {
    SendPointerEvent(event.locationInWindow.x, event.locationInWindow.y, VNCMouseEvent.leftButton.rawValue)
}

override func mouseDragged(with event: NSEvent) {
    SendPointerEvent(event.locationInWindow.x, event.locationInWindow.y, VNCMouseEvent.leftButton.rawValue)
}

override func mouseUp(with event: NSEvent) {
    SendPointerEvent(event.locationInWindow.x, event.locationInWindow.y, 0)
}
Server-side events simulation
We can handle mouse events on the Server's side by setting the ptrAddEvent callback of the rfbScreenInfo object — it'll be called every time an event is received from the Client. We will post the same events into the system, so the mouse will move and perform all the clicks as if we were actually sitting at this computer using the mouse ourselves. Again, this is very similar to how other remote desktop software works.
struct PointerState {
    var isLeftMouseDown = false
    var isMiddleMouseDown = false
    var isRightMouseDown = false
}

var currentPointerState = PointerState()

libServer.pointee.ptrAddEvent = { buttonMask, x, y, _ in
    DispatchQueue.main.async {
        guard let screenFrame = NSScreen.main?.frame else { return }
        let position = CGPoint(x: Double(x), y: screenFrame.height - Double(y))
        let pointerEvent = VNCMouseEvent(rawValue: buttonMask)

        // Post mouse position update regardless of button events
        CGEvent(mouseEventSource: nil, mouseType: .mouseMoved, mouseCursorPosition: position, mouseButton: .left)?.post(tap: .cgSessionEventTap)

        // Post mouse down/dragged/up events if needed
        let previousPointerState = currentPointerState
        currentPointerState = .init(isLeftMouseDown: pointerEvent == .leftButton,
                                    isMiddleMouseDown: pointerEvent == .middleButton,
                                    isRightMouseDown: pointerEvent == .rightButton)

        switch pointerEvent {
        case .leftButton:
            if !previousPointerState.isLeftMouseDown {
                CGEvent(mouseEventSource: nil, mouseType: .leftMouseDown, mouseCursorPosition: position, mouseButton: .left)?.post(tap: .cgSessionEventTap)
            } else {
                CGEvent(mouseEventSource: nil, mouseType: .leftMouseDragged, mouseCursorPosition: position, mouseButton: .left)?.post(tap: .cgSessionEventTap)
            }
            return
        case .middleButton:
            if !previousPointerState.isMiddleMouseDown {
                CGEvent(mouseEventSource: nil, mouseType: .otherMouseDown, mouseCursorPosition: position, mouseButton: .center)?.post(tap: .cgSessionEventTap)
            } else {
                CGEvent(mouseEventSource: nil, mouseType: .otherMouseDragged, mouseCursorPosition: position, mouseButton: .center)?.post(tap: .cgSessionEventTap)
            }
            return
        case .rightButton:
            if !previousPointerState.isRightMouseDown {
                CGEvent(mouseEventSource: nil, mouseType: .rightMouseDown, mouseCursorPosition: position, mouseButton: .center)?.post(tap: .cgSessionEventTap)
            } else {
                CGEvent(mouseEventSource: nil, mouseType: .rightMouseDragged, mouseCursorPosition: position, mouseButton: .center)?.post(tap: .cgSessionEventTap)
            }
            return
        default:
            // Post mouse-ups if needed
            if previousPointerState.isLeftMouseDown {
                CGEvent(mouseEventSource: nil, mouseType: .leftMouseUp, mouseCursorPosition: position, mouseButton: .left)?.post(tap: .cgSessionEventTap)
            }
            if previousPointerState.isMiddleMouseDown {
                CGEvent(mouseEventSource: nil, mouseType: .otherMouseUp, mouseCursorPosition: position, mouseButton: .center)?.post(tap: .cgSessionEventTap)
            }
            if previousPointerState.isRightMouseDown {
                CGEvent(mouseEventSource: nil, mouseType: .rightMouseUp, mouseCursorPosition: position, mouseButton: .center)?.post(tap: .cgSessionEventTap)
            }
        }
    }
}
Result
We're finally done. It's time to take a look at the results. We'll be streaming our Project 3D again, though this time, we'll go through the whole workflow, from connecting to the Server to controlling the remote app.
Issues and TODOs
Though we've succeeded at implementing our technical task, this prototype still requires many improvements before we can push it to production. We will list most of them:
- First and foremost, this prototype cannot be applied to just any application we launch remotely. Lots of utility apps, like CleanMyMac or CleanShot, are made to interact with the computer they're installed on. For instance, using CleanMyMac remotely doesn't make sense currently because it will simply clean the Server — it has no access to the Client machine's files. The same goes with CleanShot — although you could control it remotely, the app would capture the Server's screen. This is definitely something we'll have to research in the future: how to share filesystems or screen states over the web. Otherwise, as it is now, the category of apps applicable to this technology is quite limited.
- Although the VNC functionality has been proven to be relatively easy to implement thanks to the ready-to-use solutions, it comes with its shortcomings, and the main one is speed — the streamed picture updates smoothly if we use an app that doesn't take up the whole screen. For full-screen apps, though, the FPS drops will become noticeable instantly. This has to do with the CPU-reliant encodings used by
libvncand the fact that the CPU is currently responsible for drawing the framebuffers on-screen, too. If we could move these operations over to the GPU, the whole workflow would be much more efficient. We might have to ditch VNC altogether in the process and switch to the H.264 encoding commonly used by other streaming services. We'll come back to this in separate research, too. - Currently, there are no security features implemented in this prototype. It has to have some user authorization mechanism, and we must implement data encryption. Otherwise, pretty much anyone can connect to the Server or read your unencrypted traffic.
- We'll have to determine how to scale this technology. Currently, only one Client can be connected to the Server at a time. Due to how the mouse events are simulated, letting multiple users access the one remote machine would result in chaos, with the mouse flying around all over the place. This may be solved by setting up several VMs on a Server and letting the remote users go wild there. But, yet again, we'll have to come back to this in future research.
Conclusion
We've implemented our first prototype of application streaming. There's still much to be done, but overall, we are happy with the intermediate result. We will continue exploring the possibilities of making the experience smoother and more functional, and we'll keep you posted on any updates on the topic.
Thanks for reading 👋🏻